The second floor of my Cape-style home is heated with hydronic baseboards. During a recent remodel, I simply extended the existing hydronic lines. I received assurance from my boiler tech that the boiler and circulator pumps would support the additional demand. The original setup didn’t include a bleeder valve anywhere on the line to purge air from the system. When I bring the zone back into operation, how should I purge the air?
Master plumber Tom Cardillo, author of “Installing an On-Demand Water Heater” (FHB #276), replies: Hydronic heating systems can be configured a number of ways, and it’s not uncommon to find one without dedicated bleeder valves to purge air from the system. Generally, it’s still pretty easy to bleed air from these systems via the service valves on the return lines running to the boiler. Depending on the situation, I may bleed all of the zone loops, not just the ones I know have air in them. It doesn’t take a lot of extra time. The process has multiple steps, but the concept is simple: You’re essentially flushing new water into the system and pushing the old water out, along with the air bubbles.
Start by shutting the boiler down and letting it cool. The flushing process involves introducing fresh water to the system, and there’s a risk of cracking the hot boiler core if it isn’t allowed to cool first.
While waiting for that to cool, I often replace the pressure regulator (also called a pressure-reducing valve) on the line that feeds fresh water into the boiler. These regulators have a manual override lever that is used when bleeding the system, but the regulators are often stuck. Current code requires a shutoff valve on either side of the regulator, making it easy to change out. On older systems, you would have to drain down the boiler to change out the regulator. If the regulator works, just wait for the boiler to cool, and move on to the next step.
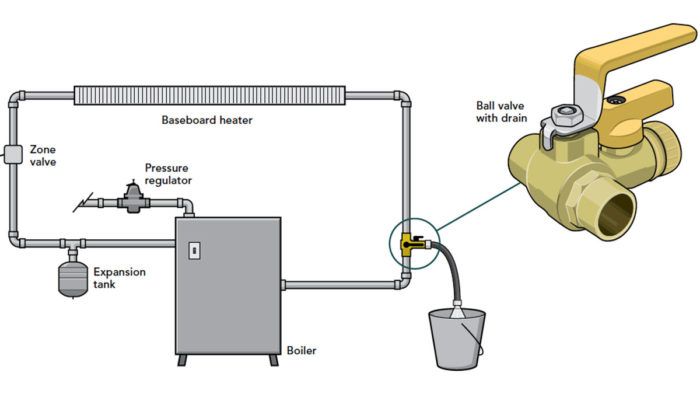
Next, identify the supply and return lines for the zone you want to purge. They form a loop that runs from and back to the boiler. The supply side of the loop should have a zone valve (often a boxy contraption), and the return side should have two valves—a ball valve to open and close the return line, and a service valve with a threaded outlet you can attach a hose to for draining the lines. There’s more than one kind of service valve used in this application, but unless it’s a combined fitting as in the drawing above, the service valve will be above the shutoff.
Attach a washing-machine hose to the service valve, and run the other end of the hose into a bucket. Then go to the zone valve. It should have a switch to lock it in the open position. Locate the switch and open the valve. Then close the ball valve on the return line.
Next, open the service valve (the one that’s attached to the hose) partway. Water should start coming out of the hose almost immediately. If there’s air in the system, you should be able to hear it moving through the pipes and see bubbles rising in the bucket as it fills with water.
Watch the boiler’s pressure gauge as you do this; it should read between 12 psi and 15 psi. Lift the manual override lever on the regulator slightly to allow fresh water into the system, but don’t flip the override lever all the way over—just let in a little extra water at a time to keep the system’s pressure within normal bounds. If the boiler’s pressure-relief valve reaches 30 psi, it will open and you’ll have a hot, wet mess.
All the while, continue monitoring the bucket for air bubbles. Don’t be surprised if you have to dump three or more buckets of water. Once the bubbles have stopped, make sure the override lever is back in its normal operating position. Then, in this order, close the service valve, move the zone valve’s switch back to its normal operating position, and open up the ball valve on the return line. Finally, turn the boiler back on. The air should be purged.
One last note on your situation: If a zone was worked on or added to, it is a good idea—even in the summer—to run the zone for a few minutes at full temperature once the work is done. The reason for this is that cold water can fill the zone at low pressure and seem fine for weeks or more, but when the boiler does finally kick on in cold weather and the water is heated, any flux sealing flaws in solder joints will melt, creating a hot leak at a bad time.
Drawing: Patrick Welsh
Fine Homebuilding Recommended Products